In any ERP system, aged receivable and payable reports are important tools for monitoring outstanding payments. It tracks invoices and bills that have remained unsettled for a certain period. These reports help sales teams follow up with customers on overdue invoices. In the aged report, each invoice is shown along with how long it has been overdue. The report categorizes invoice amounts into day-interval buckets such as 0–30, 31–60, 61–90, and so on. By default, the Odoo aged receivable report shows invoices with ageing up to 120 days. Invoices that are overdue beyond 120 days appear under the "Older" ageing bucket. However, many businesses want ageing reports that go beyond the 120-day bucket.
In this blog, we will try to add additional ageing buckets to the existing ones in the aged receivable report in Odoo 18, such as 0–30, 31–60, 61–90, 91–120, 121–150, 151–180, 181–360, and 360+ days.
For this, we need to define the new ageing buckets. To achieve this, create a data file in your custom module, inherit the existing aged receivable report, and add the new bucket columns alongside the existing columns. By default, Odoo only provides buckets up to 120 days, so we need to add ageing buckets beyond that.
<data>
   <record id="account_reports.aged_receivable_report" model="account.report">
       <field name="column_ids">
           <record id="aged_receivable_report_period6" model="account.report.column">
               <field name="name">121-150</field>
               <field name="expression_label">period6</field>
               <field name="sortable" eval="True"/>
           </record>
           <record id="aged_receivable_report_period7" model="account.report.column">
               <field name="name">151-180</field>
               <field name="expression_label">period7</field>
               <field name="sortable" eval="True"/>
           </record>
           <record id="aged_receivable_report_period8" model="account.report.column">
               <field name="name">181-360</field>
               <field name="expression_label">period8</field>
               <field name="sortable" eval="True"/>
           </record>
       </field>
   </record>
</data>
This creates a new ageing column alongside the existing columns in the aged receivable report.
- name: Defines the column label displayed in the report (for example, 121–150).
- expression_label: Links the column to a report expression with the same identifier (period6, period7, or period8).
- sortable: This enables users to sort the newly added column directly from the report interface.
To calculate the data for the additional columns defined in the data file, we also need to add the following code to the same file.
<record id="account_reports.aged_receivable_line" model="account.report.line">
   <field name="expression_ids">
       <record id="aged_receivable_line_period6" model="account.report.expression">
           <field name="label">period6</field>
           <field name="engine">custom</field>
           <field name="formula">_report_custom_engine_aged_receivable</field>
           <field name="subformula">period6</field>
           <field name="auditable" eval="True"/>
       </record>
       <record id="aged_receivable_line_period7" model="account.report.expression">
           <field name="label">period7</field>
           <field name="engine">custom</field>
           <field name="formula">_report_custom_engine_aged_receivable</field>
           <field name="subformula">period7</field>
           <field name="auditable" eval="True"/>
       </record>
       <record id="aged_receivable_line_period8" model="account.report.expression">
           <field name="label">period8</field>
           <field name="engine">custom</field>
           <field name="formula">_report_custom_engine_aged_receivable</field>
           <field name="subformula">period8</field>
           <field name="auditable" eval="True"/>
       </record>
   </field>
</record>
Each report expression is set up to use the custom computation engine, which calls the _report_custom_engine_aged_receivable method to fetch the values it needs. The subformula parameter tells the engine which ageing interval to calculate, such as period6, period7, or period8. In the same way, the label value matches the expression_label assigned to the report column, so Odoo knows where to place the calculated result. Enabling the auditable option allows users to drill down into the report and examine the accounting entries included in each ageing bucket.
Next, we need to update the _aged_partner_report_custom_engine_common() method inside the account.aged.receivable.report.handler model. In Odoo 18, this method is extended using a monkey patch, allowing us to modify the standard report behaviour without changing the core source code.
The period lists hold the ageing bucket intervals that the report engine works with. Odoo ships with a small set of predefined periods. In this customization, we add three more buckets to the list: 121–150 days, 151–180 days, and 181–360 days. Invoices that go past 360 days are placed into their own 360+ bucket.
class AgedPartnerBalanceCustomHandler(models.AbstractModel):
   _inherit = 'account.aged.partner.balance.report.handler'
   def _custom_options_initializer(self, report, options, previous_options=None):
       super()._custom_options_initializer(report,options,previous_options=previous_options,)
       for column in options.get('columns', []):
           expression_label = column.get('expression_label', '')
           if not expression_label.startswith('period'):
               continue
           period = int(expression_label[6:])
           if period == 0:
               column['name'] = 'As of Date'
           elif period == 1:
               column['name'] = '1-30'
           elif period == 2:
               column['name'] = '31-60'
           elif period == 3:
               column['name'] = '61-90'
           elif period == 4:
               column['name'] = '91-120'
           elif period == 5:
               column['name'] = '121-150'
           elif period == 6:
               column['name'] = '151-180'
           elif period == 7:
               column['name'] = '181-360'
           elif period == 8:
               column['name'] = '360+'
After updating these codes in your custom module, navigate to the Aged Receivable report, i.e., Accounting > Reporting > Aged Receivables. The new ageing bucket intervals can be seen in the report. The report groups outstanding receivables into the newly defined ageing periods, allowing users to analyze overdue amounts according to their preferred time ranges.
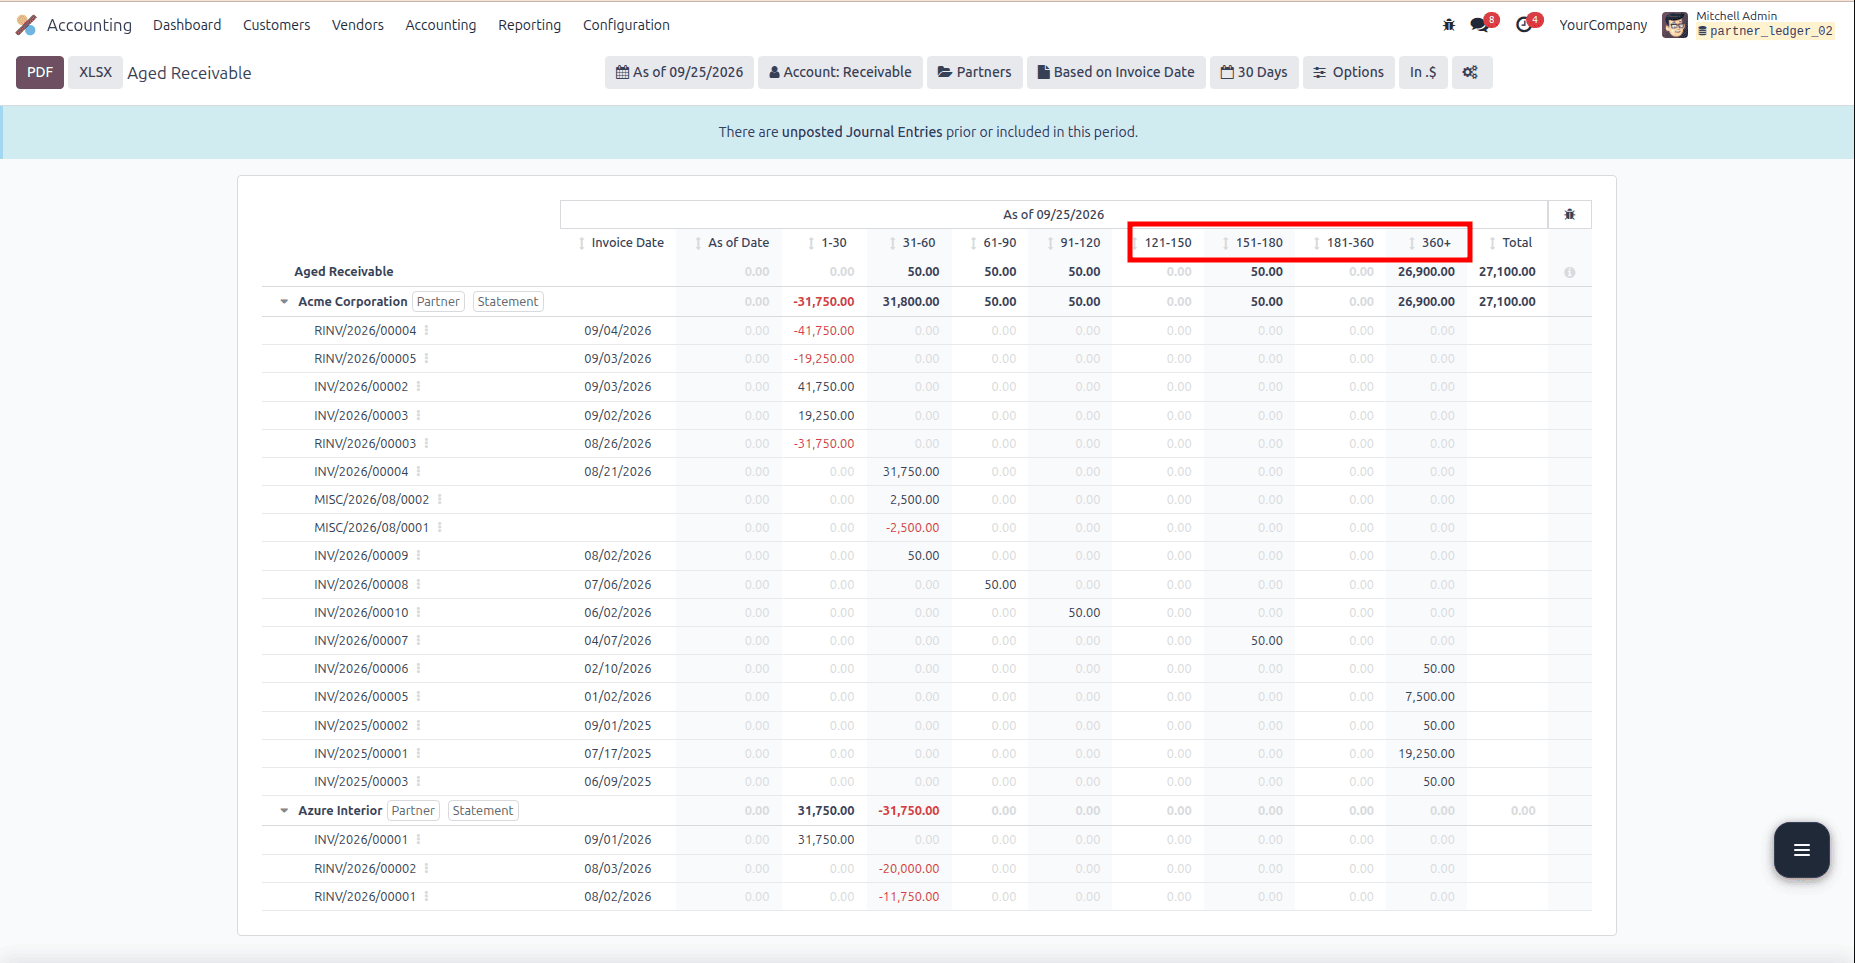
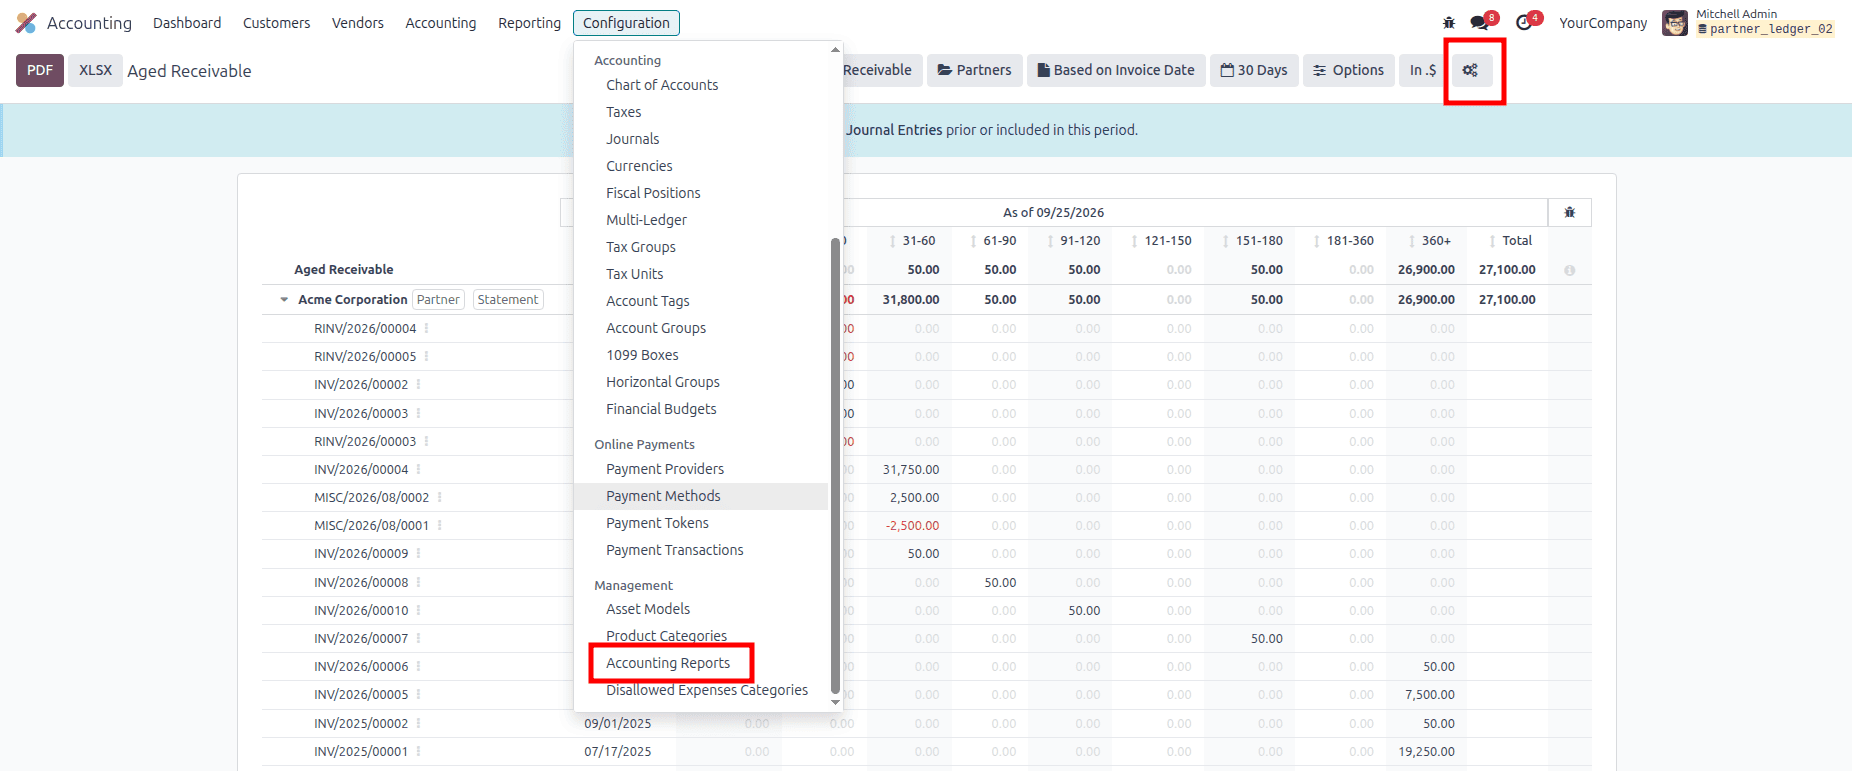
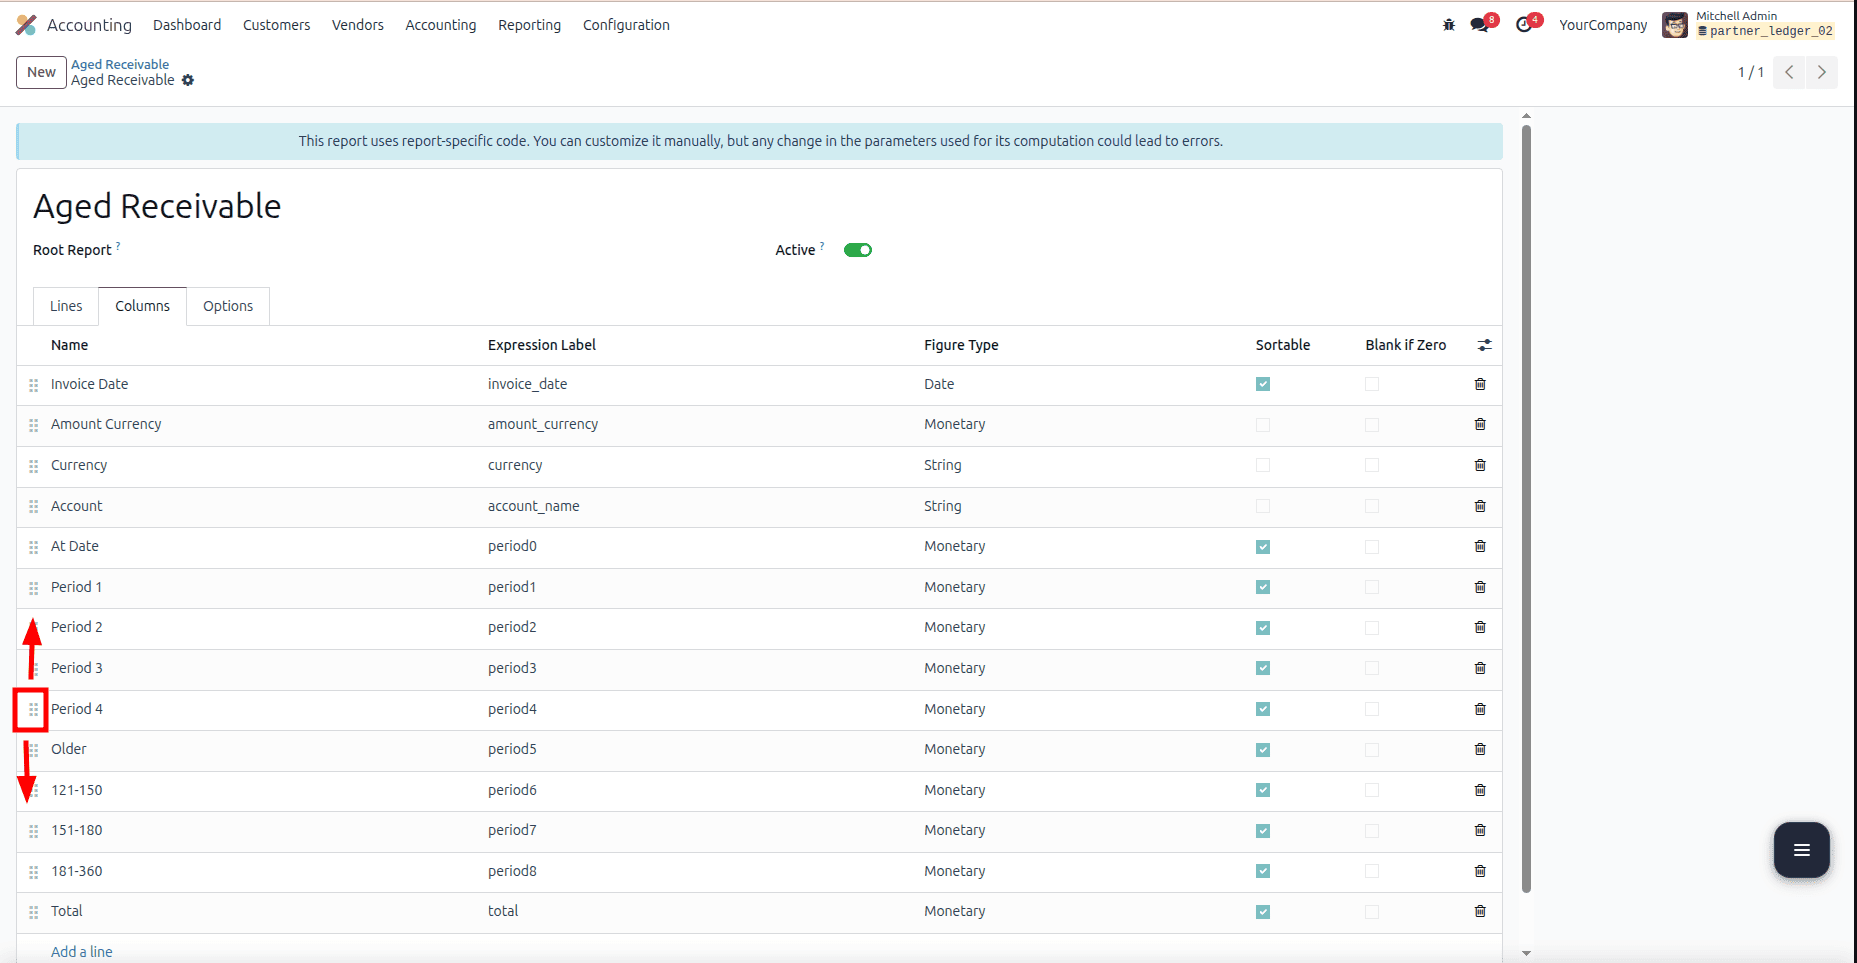
You can also customize the order in which the ageing bucket columns appear. To modify the order, enable Developer Mode and navigate to Accounting > Configuration > Accounting Reports, then open the Aged Receivable report. From there, go to the Columns section, where you can rearrange, add, or adjust the report columns however you like, or click on the gear icon in the receivable report.
Open the Aged Receivable report and head to the Columns section. To rearrange the ageing bucket columns, just change their sequence. Once you save, the report will show the columns in the new order you set.
Adding your own ageing bucket intervals lets you shape the Aged Receivable report around the way your organization actually reports. Since the standard report is extended through model inheritance, you get a more detailed view of outstanding receivables without altering Odoo's core code. That also keeps the customization easy to maintain and build on later.
To read more about How to Add a Custom Aging Bucket Interval to the Aged Receivable Report in Odoo 19, refer to our blog, How to Add a Custom Aging Bucket Interval to the Aged Receivable Report in Odoo 19.