When it comes to running a business, you need to be able to create professional reports. Odoo 19 handles this really well using what it calls QWeb templates. If you’re working with Odoo 19 and want to generate PDF reports, the process is actually straightforward. Odoo relies on QWeb templates to decide how the report should look, and once you connect the template with a report action, the system can turn any record like an invoice or a sales order into a ready-to-download PDF. This means you can create reports that match your business style and make them available directly from the Odoo interface.
This blog will walk you through the step-by-step process of creating a custom PDF report in Odoo 19 for the “project.task” model; it includes setting up the report action and the QWeb template.
Step-by-Step Process for Creating a Custom PDF Report in Odoo 19
Module Structure
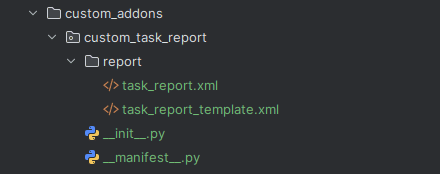
Here I have created a module named custom_task_report. This is a basic example of the module structure with a report action and report template inside the report directory.
Report Action (XML)
The next step is creating a report action for the custom report. Inside the “report” directory of your module, create an XML file. Let’s name it task_report.xml. This file contains the action that binds the report to the model. The example below shows how the XML file looks.
<?xml version="1.0" encoding="utf-8" ?>
<odoo>
   <record id="action_project_report" model="ir.actions.report">
       <field name="name">Task Report</field>
       <field name="model">project.task</field>
       <field name="report_type">qweb-pdf</field>
       <field name="report_name">custom_task_report.task_report_details</field>
       <field name="report_file">custom_task_report.task_report_details</field>
       <field name="print_report_name">'Task Report - %s' % (object.display_name)</field>
       <field name="binding_model_id" ref="project.model_project_task"/>
       <field name="binding_type">report</field>
   </record>
</odoo>
Here, in this file, we have defined the action using the following fields.
- name - Here we specify the name of the report action. It helps to find the report within the system. We have given the name “Task Report”.
- model - Specify the model to which the report is associated. The report retrieves the data from this model. We have given the model as “project.task”.
- report_type - This specifies the type of report being generated. The available options are:
- qweb-pdf - To generate the report in PDF using Qweb template.
- qweb-html - To generate the report in HTML using Qweb template.
- qweb-text - To generate the report in plain text format using Qweb template.
- report_name - It links the report action to the QWeb template that will be used to generate the output. The report name is given like “module_name.template_id” . In our case “custom_task_report.task_report_details”.
- report_file - The report_file defines the name of the QWeb template file used for the report. This file contains the XML structure for rendering the report. It’s set to "module_name.template_id". In our case “custom_task_report.task_report_details”.
- print_report_name - Specify the name of the printed report file. The name given here will be on the printed PDF.
- binding_model_id - This is a reference to the model associated with the report action, linking it to other objects. Here, it references the project.task model: "project.model_project_task".
- binding_type - This defines how the report is bound to the system.
- report - Binds the report directly to a record of the specified model.
- action - Binds the report to a specific action that is defined.
In this example, we have chosen the binding_type as report.
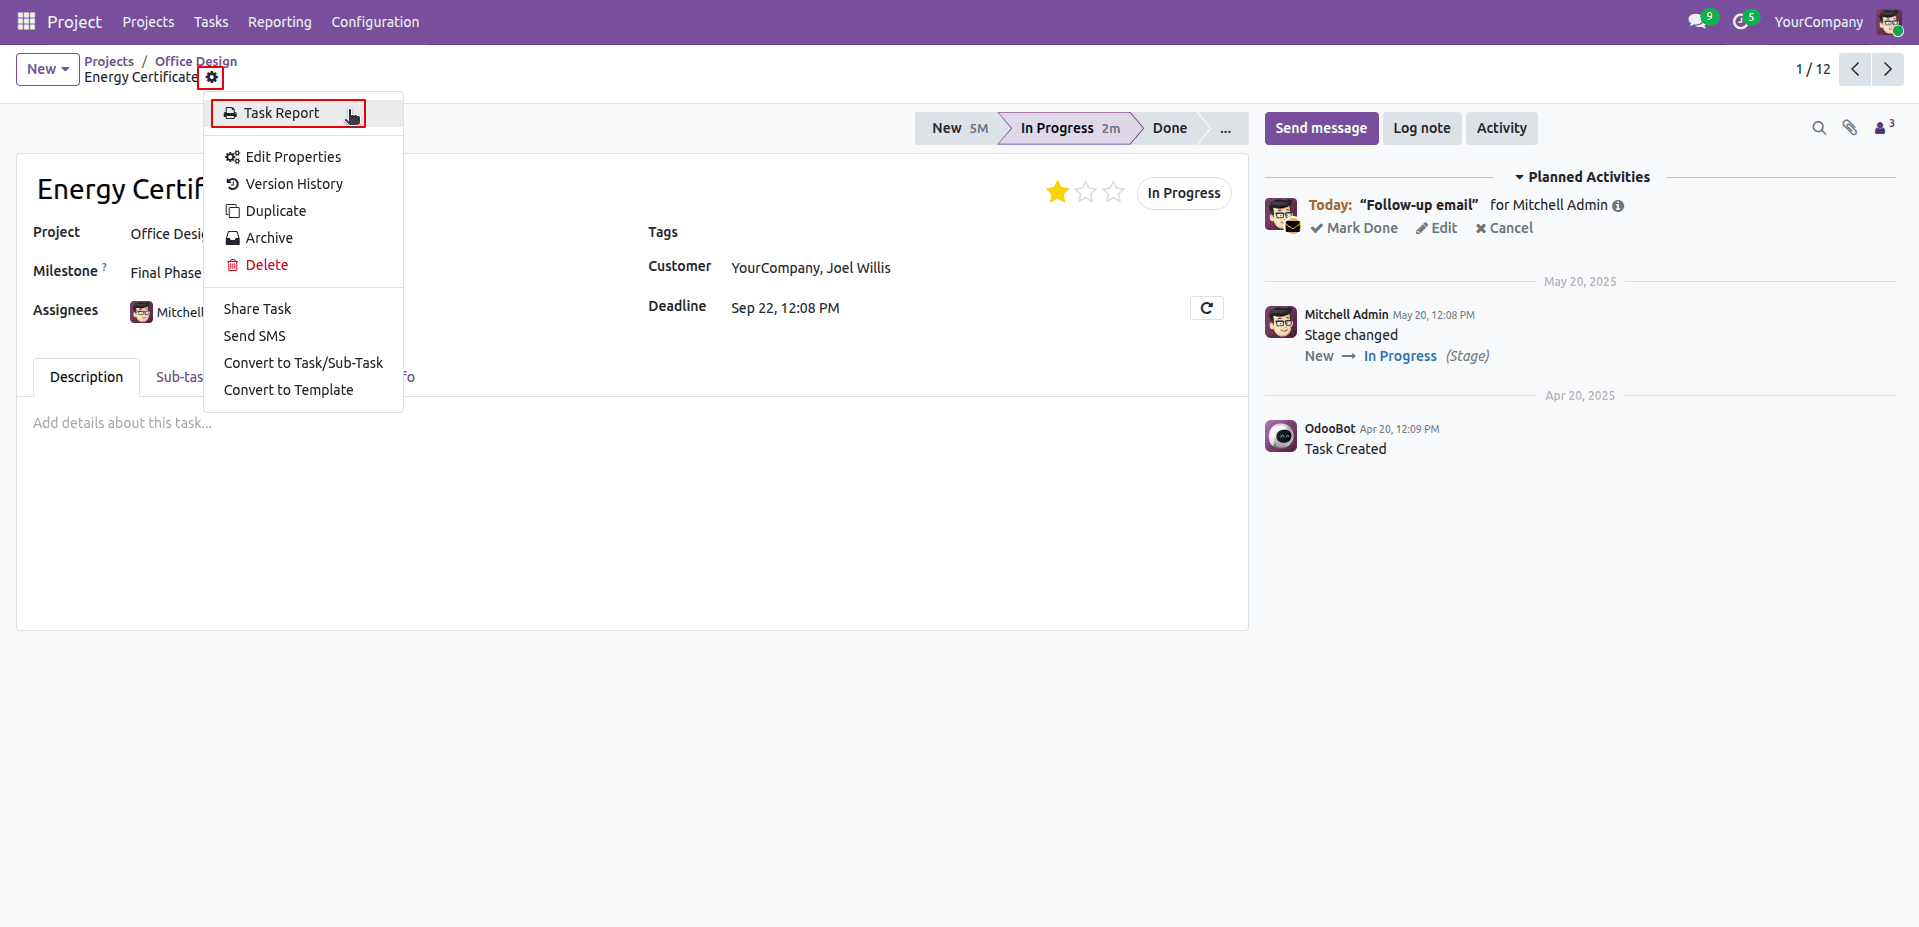
The action we have defined above will create a new menu under the gear icon of the associated model. In our case Task Report in the project.task model as shown in the screenshot below.
Qweb Template (XML)
Next, we have to define a QWeb template for the report. This defines the structure and layout of the PDF report. This file is to be created in the report directory of our module. In this example, I have created an XML file named “task_report_template.xml".
<?xml version="1.0" encoding="UTF-8" ?>
<odoo>
   <template id="task_report_details">
       <t t-call="web.html_container">
          <t t-foreach="docs" t-as="o">
               <t t-call="web.external_layout">
                   <div class="page">
                       <div class="oe_structure"/>
                       <h2>Task Report</h2>
                       <br></br>
                       <p>
                           Name :
                           <span t-field="o.display_name"/>
                       </p>
                   </div>
               </t>
           </t>
       </t>
   </template>
</odoo>
In the Qweb template XML file, you'll set up a template that has the exact same name as the report_name you used in the report action. Inside that template, we use a loop with t-foreach to go through all the task records you've selected. This way, we can create separate content for each item on the list. You can include HTML and QWeb expressions to format and display the information as required.
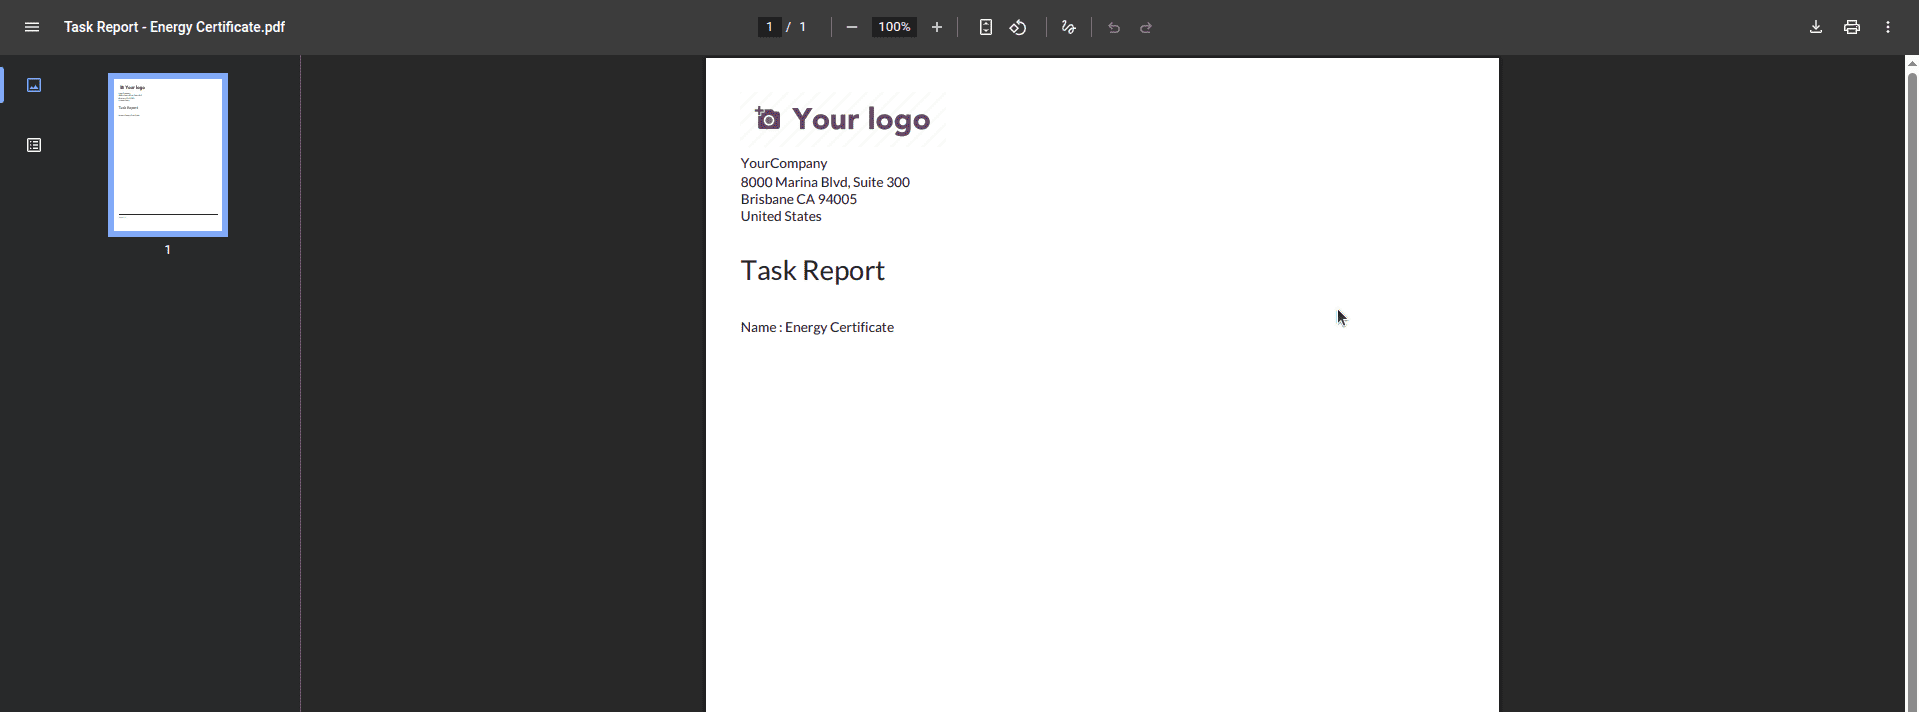
The example template we created will print the PDF report shown in the screenshot below.
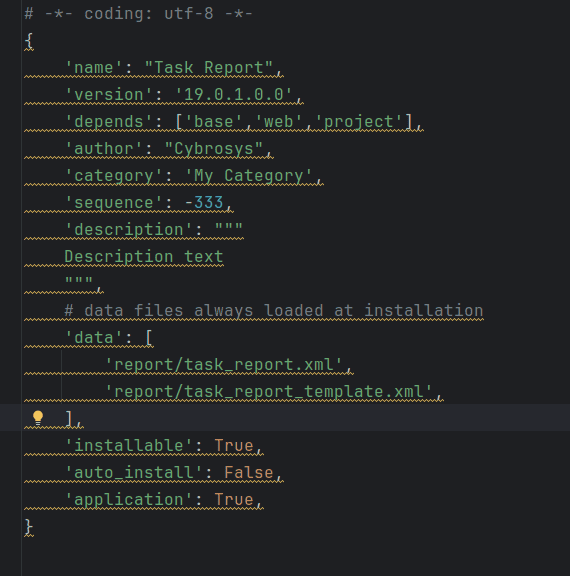
Don’t forget to add both files in the __manifest__.py file like given below in the screenshot.
How to Print a PDF Report Using a Wizard or Button
Under certain circumstances, you may need to print a report through a wizard or a button rather than directly from the model's gear icon. This approach is useful when you want to collect filter inputs from the user such as a date range or a project before generating the report. In that case, the report action is triggered programmatically through the wizard instead
Module Structure
wizard_task_report/
+-- __init__.py
+-- __manifest__.py
+-- models/
¦   +-- __init__.py
¦   +-- task_wizard_report.py    # Abstract Model
+-- report/
¦   +-- task_wizard_report_action.xml
¦   +-- task_wizard_report_template.xml
+-- security/
¦   +-- ir.model.access.csv
+-- wizard/
    +-- __init__.py
    +-- task_report_wizard.py
    +-- task_report_wizard_view.xml
Wizard Model (Python)
Inside the wizard/ directory, create task_report_wizard.py. This defines a TransientModel — the standard model type used for wizards in Odoo. It holds the user's filter inputs and contains the method that fires when the Print Report button is clicked.
from odoo import models, fields
class TaskReportWizard(models.TransientModel):
    _name = 'task.report.wizard'
    _description = 'Task Report Wizard'
    from_date = fields.Date(string='From Date', required=True)
    to_date = fields.Date(string='To Date', required=True)
    project_id = fields.Many2one('project.project', string='Project (Optional)')
    def action_print_task_report(self):
        domain = [
            ('date_deadline', '>=', self.from_date),
            ('date_deadline', '<=', self.to_date),
        ]
        if self.project_id:
            domain.append(('project_id', '=', self.project_id.id))
        tasks = self.env['project.task'].search(domain)
        data = {
            'from_date': str(self.from_date),
            'to_date': str(self.to_date),
            'project_name': self.project_id.name if self.project_id else 'All Projects',
            'task_ids': tasks.ids,
        }
        return self.env.ref(
            'wizard_task_report.action_task_wizard_report'
        ).report_action(None, data=data)
The method filters project.task records based on the user's inputs, builds a data dictionary with the task IDs and filter values, then calls report_action(None, data=data). Passing None as the first argument tells Odoo that there are no directly selected records all data comes from the data dictionary instead.
Abstract Model (_get_report_values)
Create task_wizard_report.py inside the models/ directory. This abstract model bridges the data from the wizard to the QWeb template. The _name must strictly follow this naming convention:
report.<module_name>.<report_template_id>
In our case: report.wizard_task_report.task_wizard_report_template
Its _get_report_values method receives the data dictionary passed from the wizard, fetches the actual task records using the stored IDs, and returns a values dictionary that the QWeb template can use directly.
from odoo import models, api
class TaskWizardReport(models.AbstractModel):
    _name = 'report.wizard_task_report.task_wizard_report_template'
    _description = 'Task Wizard Report Abstract Model'
    @api.model
    def _get_report_values(self, docids, data=None):
        task_ids = data.get('task_ids', []) if data else []
        tasks = self.env['project.task'].browse(task_ids)
        return {
            'doc_ids': task_ids,
            'doc_model': 'project.task',
            'docs': tasks,
            'from_date': data.get('from_date', '') if data else '',
            'to_date': data.get('to_date', '') if data else '',
            'project_name': data.get('project_name', 'All Projects') if data else 'All Projects',
        }
Report Action (XML)
Inside the report/ directory, create task_wizard_report_action.xml. Unlike the standard report action shown earlier, this one does not include binding_model_id or binding_type because this report is triggered only from the wizard, not from the model's gear icon.
<?xml version="1.0" encoding="utf-8" ?>
<odoo>
    <record id="action_task_wizard_report" model="ir.actions.report">
        <field name="name">Task Wizard Report</field>
        <field name="model">project.task</field>
        <field name="report_type">qweb-pdf</field>
        <field name="report_name">wizard_task_report.task_wizard_report_template</field>
        <field name="report_file">wizard_task_report.task_wizard_report_template</field>
        <field name="print_report_name">'Task Report'</field>
    </record>
</odoo>
QWeb Template (XML)
Create task_wizard_report_template.xml inside the report/ directory. The template id must match the report_name in the report action. The values returned from _get_report_values such as from_date, to_date, project_name, and docs are available directly as variables inside the template.
<?xml version="1.0" encoding="UTF-8" ?>
<odoo>
    <template id="task_wizard_report_template">
        <t t-call="web.html_container">
            <t t-call="web.external_layout">
                <div class="page">
                    <div class="oe_structure"/>
                    <h2 class="text-center">Task Report</h2>
                    <hr/>
                    <div class="row mb-4">
                        <div class="col-6">
                            <strong>Project: </strong>
                            <span t-esc="project_name"/>
                        </div>
                        <div class="col-3">
                            <strong>From: </strong>
                            <span t-esc="from_date"/>
                        </div>
                        <div class="col-3">
                            <strong>To: </strong>
                            <span t-esc="to_date"/>
                        </div>
                    </div>
                    <table class="table table-bordered table-sm">
                        <thead class="table-primary">
                            <tr>
                                <th>#</th>
                                <th>Task Name</th>
                                <th>Project</th>
                                <th>Assigned To</th>
                                <th>Deadline</th>
                                <th>Stage</th>
                            </tr>
                        </thead>
                        <tbody>
                            <t t-foreach="docs" t-as="task">
                                <tr>
                                    <td t-esc="task_index + 1"/>
                                    <td t-field="task.display_name"/>
                                    <td t-field="task.project_id.name"/>
                                    <td>
                                        <t t-foreach="task.user_ids" t-as="user">
                                            <span t-esc="user.name"/>
                                            <t t-if="not user_last">, </t>
                                        </t>
                                    </td>
                                    <td t-field="task.date_deadline"/>
                                    <td t-field="task.stage_id.name"/>
                                </tr>
                            </t>
                        </tbody>
                    </table>
                    <div class="mt-3">
                        <strong>Total Tasks: </strong>
                        <span t-esc="len(docs)"/>
                    </div>
                </div>
            </t>
        </t>
    </template>
</odoo>
Wizard View (XML)
Create task_report_wizard_view.xml inside the wizard/ directory. This defines the form dialog the user sees and adds a menu item under Project/Reporting to open it.
<?xml version="1.0" encoding="utf-8" ?>
<odoo>
    <record id="view_task_report_wizard_form" model="ir.ui.view">
        <field name="name">task.report.wizard.form</field>
        <field name="model">task.report.wizard</field>
        <field name="arch" type="xml">
            <form string="Generate Task Report">
                <group>
                    <group string="Date Range">
                        <field name="from_date"/>
                        <field name="to_date"/>
                    </group>
                    <group string="Filters">
                        <field name="project_id"/>
                    </group>
                </group>
                <footer>
                    <button name="action_print_task_report"
                            string="Print Report"
                            type="object"
                            class="btn-primary"/>
                    <button string="Cancel"
                            class="btn-secondary"
                            special="cancel"/>
                </footer>
            </form>
        </field>
    </record>
    <record id="action_open_task_report_wizard" model="ir.actions.act_window">
        <field name="name">Task Report</field>
        <field name="res_model">task.report.wizard</field>
        <field name="view_mode">form</field>
        <field name="target">new</field>
    </record>
    <menuitem id="menu_task_report_wizard"
              name="Task PDF Report"
              parent="project.menu_projects_report"
              action="action_open_task_report_wizard"
              sequence="20"/>
</odoo>
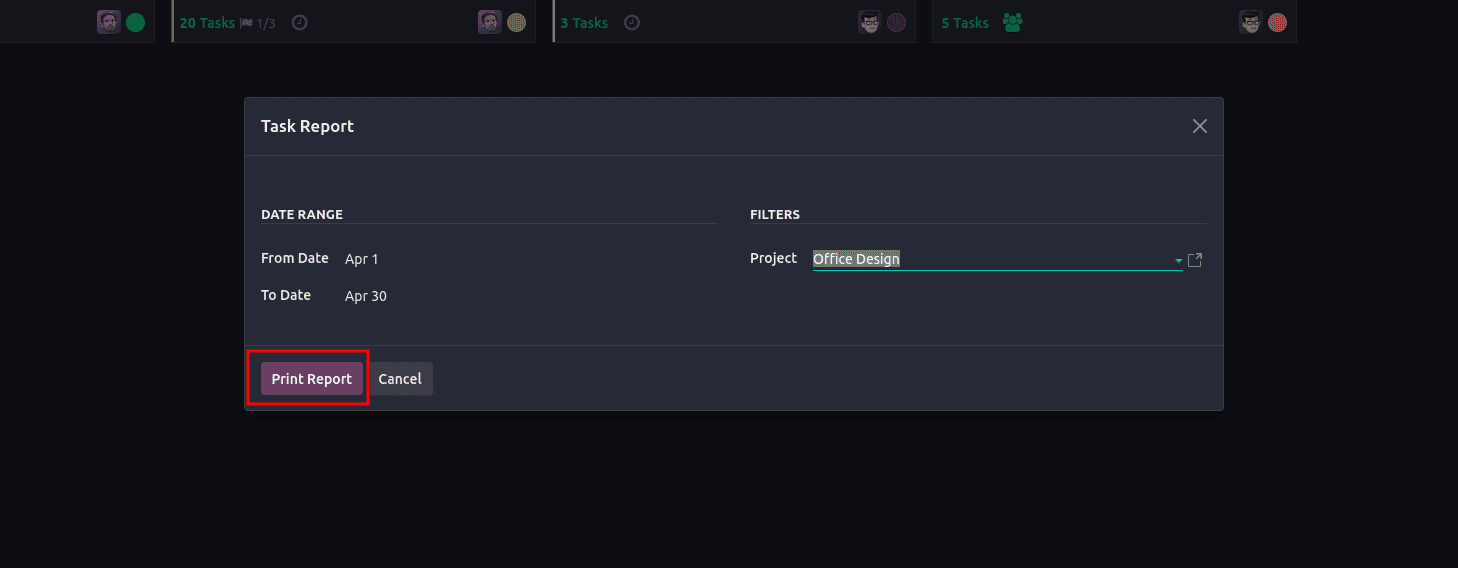
The example screenshots of the wizard report is shown below.
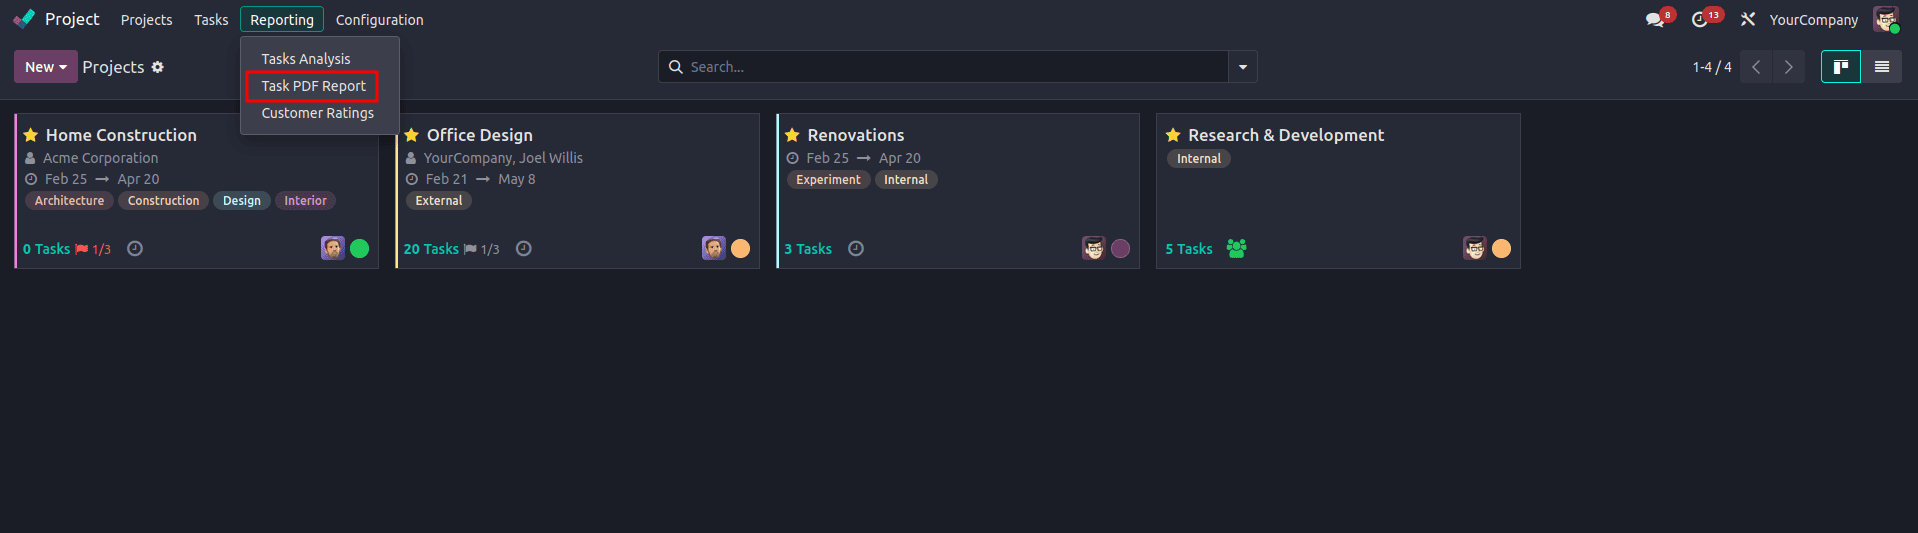
After selecting the menu, we will get a wizard where we can select the filters and then click the print button; it will generate the report.
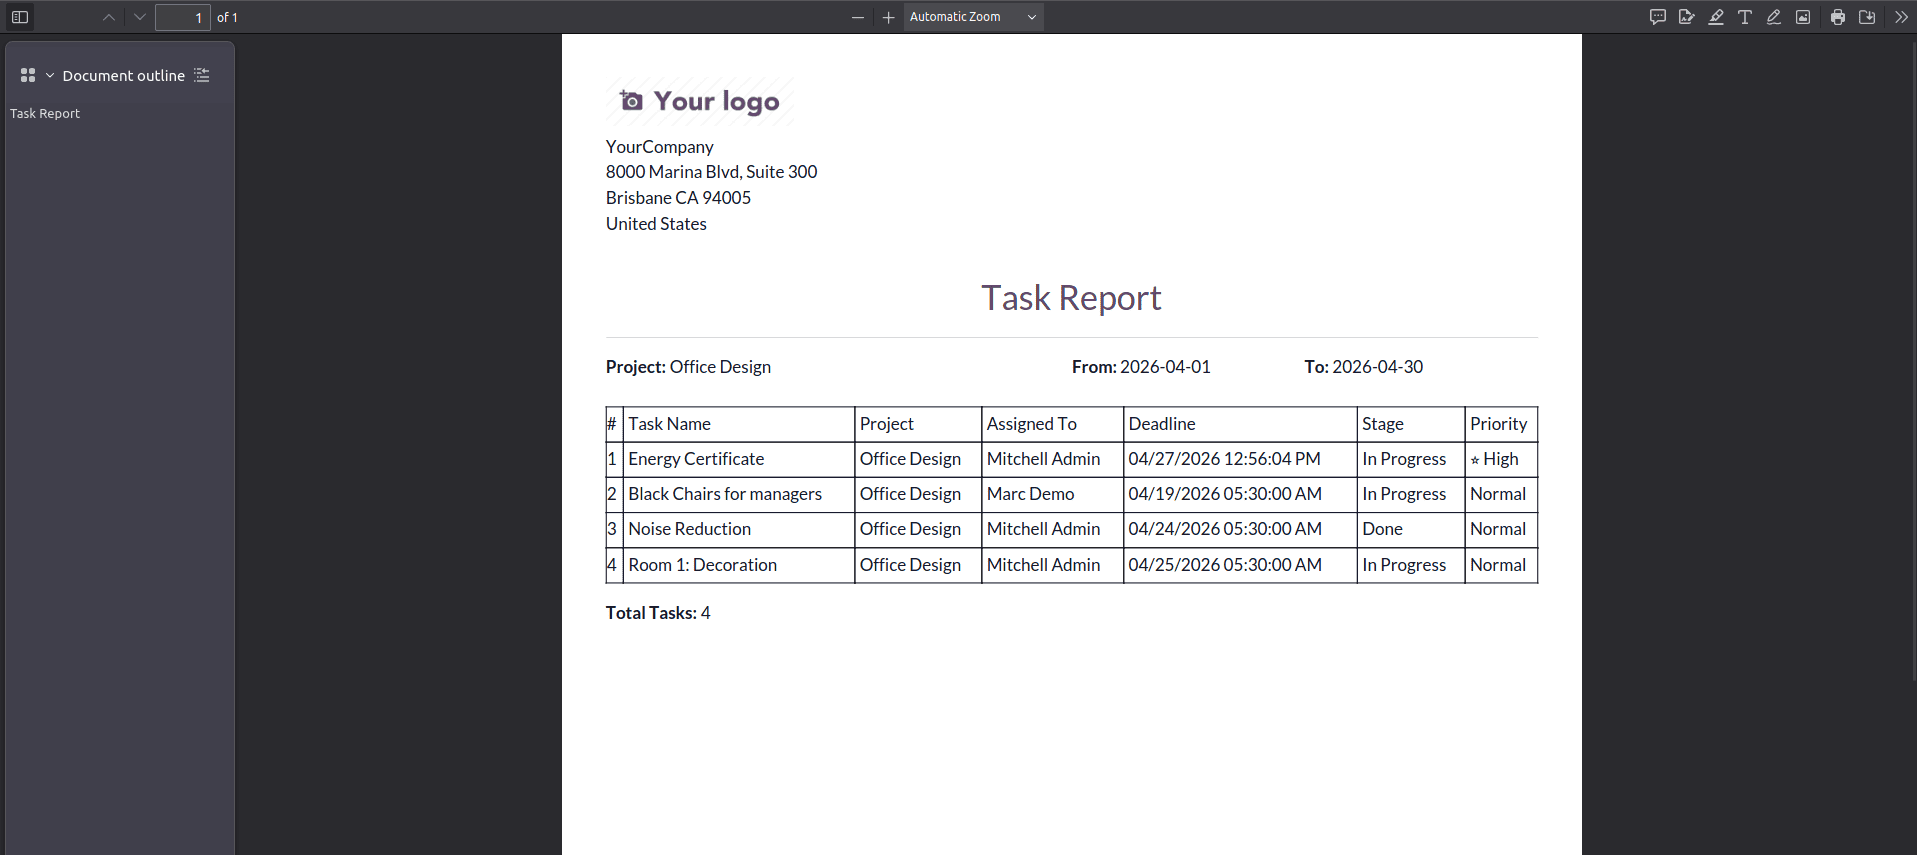
After clicking the print report button, we can get the report. The report generated is as shown below.
Creating PDF reports in Odoo 19 with QWeb is a simple yet powerful way to present your data in a professional format. By configuring a report action and designing a custom QWeb template, you can build reports that are both structured and visually clear. With this approach, businesses can generate documents that fit their specific needs while keeping everything smoothly integrated into the Odoo environment.
To read more about How to Create a PDF Report in Odoo 18, refer to our blog How to Create a PDF Report in Odoo 18.